cells-left cells-left

Lock Documents Editing Bot

Provide a seamless experience within your document workflows. Configure Flows to lock automatically in order to prevent unwanted altering of contracts, invoices, and other documents.
Try automation, it’s free!
What the Bot does
The Bot locks a Flow’s editing access based on the ‘if-this-then-that’ conditions you’ve set.
When to use
Install and configure the Bot when you need to lock a Flow for editing while leaving it open for viewing.
  • Author airSlate Inc.
  • Setup duration 5-10 min.
  • Used in 42 Templates
  • Used in 24 Workspaces
  • Installed 477 times in the last 30 days
  • 100% success rate
Star Rating
4.7 out of 5
(26 votes)
You’ve already rated this bot

Get your automated workflows up and running in minutes with the Lock Documents Editing Bot. No coding required.

picture-1
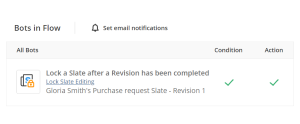
Add multiple conditions and tell the Bot to run when all or some of them are executed
Add conditions for when the Bot should run
Define what will trigger the Bot to act. These can be a specific date, document data, user roles, email, or name. E.g., select all fields and tell the Bot to lock a Flow each time every fillable field has been filled out.
Note: To install and configure Bots, start by creating a workflow.
picture-2-part-1 picture-2-part-2
View the Bots log or use tags to check if the Bot ran successfully
Get the Flow locked automatically
Once the Bot is configured, share your document with anyone who needs to sign and complete it. Based on the conditions you’ve set, each Flow will be locked to prevent recipients from altering documents.
Show more
texture 1 texture 2 texture 3

Install the Lock Documents Editing Bot
to automate your document workflows

Learn more in this Bot’s airSlate Academy course

Learn more
Learning illustration

Questions & answers

Here is a list of the most common customer questions. If you can’t find an answer to your question, please don’t hesitate to reach out to us.

Select the time in the bottom right corner of your screen. Select Settings. Under "Connected devices," select your Android phone. Select Smart Lock and enter your password. Select Unlock device and sign in to Google Account.

Turn on your Pixel Flow. Your Pixel Flow is ready to go, straight out of the box. Just hold down the power button to turn it on. Connect to Wi\u2011Fi and sign in. Connect to your Wi\u2011Fi and follow the onscreen steps. Then sign in with your Google Account. Get going. Have fun.

0:48 2:10 Suggested clip Pixel Flow | How to Use Your Pixel Flow Keyboard Touchpad ...YouTubeStart of suggested clipEnd of suggested clip Pixel Flow | How to Use Your Pixel Flow Keyboard Touchpad ...

Sign out of your device. Press and hold Ctrl + Alt + Shift + r. Select Restart. In the box that appears, select Powerwash. Continue. Follow the steps that appear and sign in with your Google Account. ... Once you've reset your device:

Press the Power button (located on the right edge). Alternate methods include double tapping the screen and flipping the phone over (if it is face down). Depending upon the screen lock type, do one of the following: Swipe the screen up or down. Draw the current unlock pattern.

Turn off your device by holding down the Power , or selecting the time in the bottom right and choosing Power. Wait 1 minute. Press and hold the Power. + Volume up button for 10 seconds.

Turn on your Pixel Flow. Your Pixel Flow is ready to go, straight out of the box. Just hold down the power button to turn it on. Connect to Wi\u2011Fi and sign in. Connect to your Wi\u2011Fi and follow the onscreen steps. Then sign in with your Google Account. Get going. Have fun.

Turn on your device. Connect your device to Wi-Fi. In the bottom right, select the time. Select Settings . At the bottom of the left panel, select About Chrome OS. Under "Google Chrome OS," you'll see which version of the Chrome operating system your device is using. Select Check for Updates.

The Lock the Flow Bot

Document workflow automation gives any organization new opportunities to improve their business processes. Lots of companies deal with sensitive information that should be protected from unauthorized use and unwanted changes. This is where the Lock the Flow Bot will help you keep important documents secure.

Lock workspaces when you need to:

  • Ensure data security and prevent unnecessary changes
  • Get documents completed by the right people
  • Restrict access to documents

Once a document has been locked, it will be available for view-only access.

While setting up the Bot, you can add conditions for when the Bot will be triggered. It can be a specific date, recipient under a specific role or with a particular email or even changes to a document. Utilizing the Lock Documents Editing Bot gives you an opportunity to lock a workspace after the recipient(s) has/have signed the document. For example, you can enable workflow auto lock when all fillable fields in a document have been filled out.

With the help of airSlate Bots, you get entire document workflow automation. From document generation populated with data from a CRM or a database, to e-signature workflows and notifications. Try out airSlate automation for free!