cells-left cells-left

Export to NetSuite Bot

Eliminate manual data entry errors while ensuring business data accuracy and accountability. Automatically transfer data to the NetSuite records of your choice using the Export to NetSuite Bot
Try automation, it’s free!
What the Bot does
The Bot uploads completed document(s) to the selected NetSuite record(s) based on the ‘if-this-then-that’ conditions you’ve set.
When to use
Install and configure the Bot to automatically send completed sales orders, new contact forms, sales quotations, contracts, and more to the NetSuite record of your choice.
  • Author airSlate Inc.
  • Setup duration 5-10 min.
  • Used in 56 Templates
  • Used in 15 Workspaces
  • Installed 317 times in the last 30 days
  • 99% success rate
Star Rating
4.6 out of 5
(28 votes)
You’ve already rated this bot

Get your automated workflows up and running in minutes with the Export to NetSuite Bot. No coding required.

picture-1
Add search conditions to quickly find the record you need
Configure Bot settings
First, connect to your NetSuite account. Once connected, select a base record and related entity, if any. Then, find the starting record you need and select one or multiple documents that will be uploaded to the NetSuite record.
Note: To install and configure Bots, start by creating a workflow.
picture-1
Add multiple conditions and tell the Bot to run when all or some of them are executed
Add conditions for when the Bot should run
Define what will trigger the Bot to act. These can be a specific date, document data, user roles, email, or name. E.g., select document fields and tell the Bot to export the document when these fields have been filled out.
picture-2-part-1 picture-2-part-2
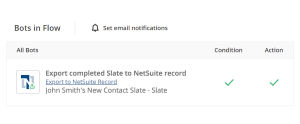
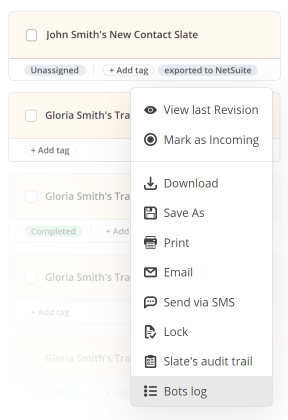
View the Bots log or use tags to check if the Bot ran successfully
Get your data exported in seconds
Once the Bot is configured, share your document with anyone who needs to sign and complete it. Based on the conditions you’ve set, the completed document will be uploaded to the selected NetSuite record.
Show more
texture 1 texture 2 texture 3

Install the Export to NetSuite Bot
to automate your document workflows

Learn more in this Bot’s airSlate Academy course

Learn more
Learning illustration

Questions & answers

Here is a list of the most common customer questions. If you can’t find an answer to your question, please don’t hesitate to reach out to us.

In Sage Accounts, browse to and select the required report then click Export. Browse to the folder where you want to save the exported data and enter a file name. In the Save as type drop-down click Comma Separated Value Files (*.csv) then click Save.

0:16 4:08 Suggested clip Sage 50 Tutorial Importing and Exporting Data Sage Training ...YouTubeStart of suggested clipEnd of suggested clip Sage 50 Tutorial Importing and Exporting Data Sage Training ...

From the main menu of Sage 50 click on Reports, Lists, Customers. The Customer List Options box will come on. Press Select All. Click OK. It will then generate the Customer List Report. Go to the File menu on the Report. Click EXPORT. The "Export Selection" box will pop up.

0:16 4:08 Suggested clip Sage 50 Tutorial Importing and Exporting Data Sage Training ...YouTubeStart of suggested clipEnd of suggested clip Sage 50 Tutorial Importing and Exporting Data Sage Training ...

We highly recommend you get the file type exported, which you are going to import from Sage 50, before the importing of data gets started. Then the template of exported file will be used, all you have to ensure is that data format and column structure matches, only then the import will be successful.

0:01 0:52 Suggested clip Importing Your Bank Statements in Sage 50 Accounting - YouTubeYouTubeStart of suggested clipEnd of suggested clip Importing Your Bank Statements in Sage 50 Accounting - YouTube

To export data In Sage Accounts, browse to and select the required report then click Export. Browse to the folder where you want to save the exported data and enter a file name. In the Save as type drop-down click Comma Separated Value Files (*. csv) then click Save.

To export data In Sage Accounts, browse to and select the required report then click Export. Browse to the folder where you want to save the exported data and enter a file name. In the Save as type drop-down click Comma Separated Value Files (*. csv) then click Save.

Launch NetSuite Export without the need to code

Workflow automation has resulted in significant improvements in customer relationships. These improvements have enabled businesses to expand their impact, gaining clients and extending long-term relationships. However, business process automation isn’t always candy and sunshine. It brings an array of new issues and obstacles. This includes the often long and expensive integration process. airSlate solves this business automation issue with its configurable Bots that have been developed as an advanced end-to-end solution without the need to code. Reducing the time it takes to implement and integrate with other platforms.

Boasting an advanced NetSuite integration API, airSlate is absolutely essential for B2B partnerships. One example of this is how airSlate Bots can connect two separate departments together via one automated workflow. For example, have the marketing department send out a customer form. Once the form is completed, the respective Bot automatically arranges NetSuite export and pins it to the customer profile as a PDF. This enhances regular and timely updates among the departments and prevents hiccups and inaccuracies.

Double your benefits by using airSlates Bots:

  • Enhanced throughput
  • Increased business predictability
  • Improved consistency of workflow
  • Decreased expenses
  • Eliminated human errors

NetSuite integration opportunities set airSlate apart from other platforms. Organizations that work with airSlate save heavily on the usual costs of integration. The no-code feature that comes with airSlate automation makes it so that any of your colleagues/employees can easily start automating your document workflows without outside help.

Automate repetitious tasks without having to write code

Implement Export to NetSuiteBot

Start creating a new Flow and import samples or generate templates right in the system to enable the Bots option. Find an appropriate Bot from the list.

Configure it

Open the Bot adjustment menu. Fill out all the required fields to modify general and advanced settings. Don’t forget about determining activation conditions in order to avoid false activations (you can include a couple of conditions).

Investigate the way it works

Implement the workflow and explore the outcomes. Ensure that the software robots are operating correctly. If something fails, look into the Bots log to correct the errors and execute your Flow again.
Illustration for How to Guide section